Blog
by Hasso Mehide
Enhancing the Kubernetes-native developer experience using Skaffold
As the adoption of cloud technologies increases and more staging and production environments are migrated to Kubernetes, many teams are facing a question: What happens with the dev environment?
Some developers run their services bare-metal on their laptops for the best performance. Ideally, we want dev and prod environments to be as similar as possible, and Docker provides us with the required abstraction most of the time, so other developers use Docker Compose or often a custom solution for managing their containers. But when applications become increasingly Kubernetes-native, the need arises for a Kubernetes-based development setup.
The problem
Running Kubernetes itself on a development machine is not a problem as there are many different solutions out there: minikube, kind, k3d, to name a few. And instead of a local cluster, you can always have a remote cluster dedicated to development environments. But the process of building container images, pushing them to your cluster/registry, and redeploying your application certainly brings an overhead to the development experience that wasn’t there before. We need a tool that can automate all this so we can focus on code and leave the boring parts to our toolchain.
Skaffold is one of these tools. It is a command line program that doesn’t require a cluster-side controller, is configured through a single declarative YAML file, and can handle the entire build+deploy pipeline necessary to develop something on Kubernetes. If your workflow is missing a piece, this might be it. And if you’re still trying to figure out how to automate your setup, then this provides a way to skip the Docker Compose or custom scripts stage entirely and get straight into Kubernetes-native development.
In this post, we are looking through some sample use cases of Skaffold. Experience with Docker and Kubernetes is assumed. To run the examples, the following command line tools are required:
- docker
- minikube, kind, k3d or any other local/remote development cluster (this article uses minikube)
- kubectl and a kubeconfig that points to said cluster
- skaffold – get it from https://skaffold.dev/docs/install/
Creating our sample project
Skaffold works with anything that can run in a container, so let’s create our sample application in a single Dockerfile without any source code. We could use an even simpler nginx hello-world image, but for better demonstration purposes let’s build a Java app instead, using Micronaut’s sample repository.
FROM alpine/git AS clone
WORKDIR /tmp
RUN git clone --depth 1 https://github.com/micronaut-guides/creating-your-first-micronaut-app.git src

FROM openjdk:8-alpine AS build
COPY --from=clone /tmp/src/complete /tmp/src
WORKDIR /tmp/src
RUN apk add bash && ./gradlew assemble

FROM openjdk:8-jre-alpine
COPY --from=build /tmp/src/build/libs/complete-0.1-all.jar /opt/example.jar
ENTRYPOINT ["java", "-jar", "/opt/example.jar"]
Build the image and run it:
docker build -t skaffold-sample-app .
docker run -it -p 8080:8080 skaffold-sample-app
You should see a “Startup completed” log message and be able to access the sample service at http://localhost:8080/hello.
Running the app in Kubernetes
Now, let’s see what our sample Kubernetes deployment looks like.
apiVersion: apps/v1
kind: Deployment
metadata:
  name: skaffold-sample-app
  namespace: default
spec:
  replicas: 1
  selector:
    matchLabels:
      app: skaffold-sample-app
  template:
    metadata:
      labels:
        app: skaffold-sample-app
    spec:
      containers:
      - name: skaffold-sample-app
        image: skaffold-sample-app
        imagePullPolicy: IfNotPresent
        ports:
        - containerPort: 8080
Sidenote: Resource constraints and health probes are intentionally omitted from the example to keep it short – don’t do this in production.
Let’s start our local cluster and run the app. Note that for minikube, we need to build the image using its own docker daemon for it to become available in the cluster.
minikube start
eval $(minikube docker-env)
docker build -t skaffold-sample-app .
kubectl apply -f k8s/deployment.yaml
Use port-forwarding to access the service at http://localhost:8080/hello:
kubectl port-forward skaffold-sample-app-[pod-hash] 8080
This is starting to look good – the building and deployment of the app is standardized and the configuration is stored in the repo, so all developers on the team can make use of this. However, several problems appear:
- we have to manually build a new image every time the source code changes
- we have to tag each new image and update the deployment.yaml to redeploy (but it doesn’t make sense to commit the change)
- we have to manually apply the updated deployment.yaml to the cluster
- on redeployment, our port-forwarding will break, and we have to run it again
Of course most of this can be remedied by some bash script automation, but there is a better way.
Skaffold to the rescue
Let’s create a Skaffold configuration file that looks like this:
apiVersion: skaffold/v2beta10
kind: Config
metadata:
  name: skaffold-sample-app
build:
  artifacts:
  - image: skaffold-sample-app
    docker:
      dockerfile: Dockerfile
  tagPolicy:
    sha256: {}
deploy:
  kubectl:
    manifests:
    - k8s/*.yaml
If you have been able to keep up so far, this configuration should be self-explanatory: the image must be built using the Dockerfile and after that all .yaml files in the k8s directory must be deployed using kubectl. Let’s try it out:
skaffold run
After some time, the pod should be up and running. Let’s review what this command does:
- Generates an image tag using the configured policy
- Checks the cache for an existing docker image
- Detects a minikube cluster and switches to its own docker daemon
- kind and k3d image loading mechanisms are also supported; for other clusters the image is pushed to a registry
- Builds a docker image using the generated tag
- Deploys the YAML manifest while replacing the image tag on the fly
- Waits for the pod to become ready
This gives us a simple way to run the application from source with a single command. All you need is Docker, a Kubernetes cluster, and some command line tools installed.
By the way, “skaffold run” can be split into “skaffold build” and “skaffold deploy,” which may also be used to build a CI/CD pipeline. However, in this post we will keep focusing on the development workflows.
You can stop the application using “skaffold delete,” which is the equivalent of doing “kubectl delete” for each .yaml file defined in your deploy configuration.
Continuous development
We have now managed to start and stop the application in our development cluster using Skaffold. Let’s look at some more features that further simplify our development workflow.
skaffold dev
This does everything that “skaffold run” does, plus:
- Streams the container logs to your terminal
- Watches for file changes, rebuilds and redeploys if necessary
- Runs in the foreground and deletes created resources when the process is stopped (e.g. Ctrl+C is pressed)
skaffold debug
In turn, this does everything that “skaffold dev” does, plus configures debugging if supported for your stack. At the time of writing, Java, .NET Core, Go, NodeJS and Python are supported. In our Java example, debugging is enabled using the JAVA_TOOL_OPTIONS environment variable.
You can use “skaffold debug –port-forward” so you don’t have to explicitly call “kubectl port-forward” every time. This exposes both the http and debugger ports of the application.
Summary so far
The combination of Skaffold and Kubernetes is a really nice solution for both existing team members and newcomers to quickly start developing on any application. In one of our older projects at Nortal, we have multiple Java services that are set up in various different ways: either by running from main class, calling a Gradle task or even deploying to an external Tomcat. Sometimes, setting up the development environments for all these services would take a newcomer 1 to 2 entire working days. Skaffold has reduced this to whatever time it takes them to install their IDE, Docker, a few command line tools, and run “git clone” and “skaffold dev”.
Obviously, a real application needs configuration as well. We have taken the approach of including opinionated ConfigMaps in our repos that work for typical development scenarios. We have also created some pre-made Skaffold profiles (https://skaffold.dev/docs/environment/profiles/) for all developers to use to switch between common configurations, e.g., run the app against different data sources.
The development loop Skaffold creates is usually pretty fast if your Dockerfile is built right, i.e., your dependencies are cached, and only the application layer gets rebuilt. However, in many cases, the codebase is large, compilation takes time, and application startup is slow – making you want to avoid rebuilding and redeploying as much as possible. Many Java developers use reloading tools like JRebel, and you can still do that. But keep in mind that in a Kubernetes pod, the Java app behaves like a remote server so you need to make use of your tools’ remote server support.
Another feature of Skaffold that we will try next is file syncing, which could come in handy if your setup already has file watching and incremental compilation.
File syncing
Let’s forget about our Java app for a while and try a different example: Angular. If you’re familiar with it, you already know that it doesn’t make sense to run “ng build –prod” every time you want to test a small change because it would take ages. Angular CLI has a built-in HTTP server that can watch for file changes and recompile the app incrementally. Let’s look at how we can combine that with Skaffold’s file syncing feature to develop the app in Kubernetes while avoiding rebuilds.
For this demo, we need some real source files for Skaffold to watch, so let’s grab an Angular tutorial:
wget https://angular.io/generated/zips/getting-started/getting-started.zip
unzip getting-started.zip
Our configuration files look like this:
FROM node:14-alpine AS deps
WORKDIR /src
COPY package.json .
RUN npm install --ignore-scripts

FROM node:14-alpine
WORKDIR /src
COPY --from=deps /src/node_modules node_modules
COPY . .
ENTRYPOINT ["npm", "run", "start", "--", "--disableHostCheck", "--host", "0.0.0.0"]
Note that these startup flags are insecure and meant for development use only.
apiVersion: apps/v1
kind: Deployment
metadata:
name: skaffold-angular-example
namespace: default
spec:
replicas: 1
selector:
  matchLabels:
    app: skaffold-angular-example
template:
  metadata:
    labels:
      app: skaffold-angular-example
  spec:
    containers:
      - name: skaffold-angular-example
        image: skaffold-angular-example
        imagePullPolicy: IfNotPresent
        ports:
          - containerPort: 4200
apiVersion: skaffold/v2beta10
kind: Config
metadata:
name: skaffold-angular-example
build:
artifacts:
  - image: skaffold-angular-example
    docker:
      dockerfile: Dockerfile
    sync:
      infer:
        - src/**/*
tagPolicy:
  sha256: { }
deploy:
kubectl:
  manifests:
    - k8s/*.yaml
portForward:
- resourceType: Deployment
  resourceName: skaffold-angular-example
  namespace: default
  port: 4200
This time we have added a “sync” block to the build section of our skaffold.yaml. It means that any files in the “src” directory will be watched for changes and synced into the running pod. The sync destination will be inferred from the Dockerfile.
The app can now be built and run using “skaffold dev –port-forward”. This will install dependencies in a separate cacheable image layer, compile the app and start the Angular web server, which will be accessible at http://localhost:4200.
Now, change something in the source code, for example, in src/index.html. You will see from Skaffold’s output that it’s syncing a file, and then the Angular CLI process picks it up and compiles, all without rebuilding the image and in less than a second.
Note that while this example is based on Angular and its “ng serve” feature, the idea applies to any stack that can do incremental updates based on file changes.
IDE integration
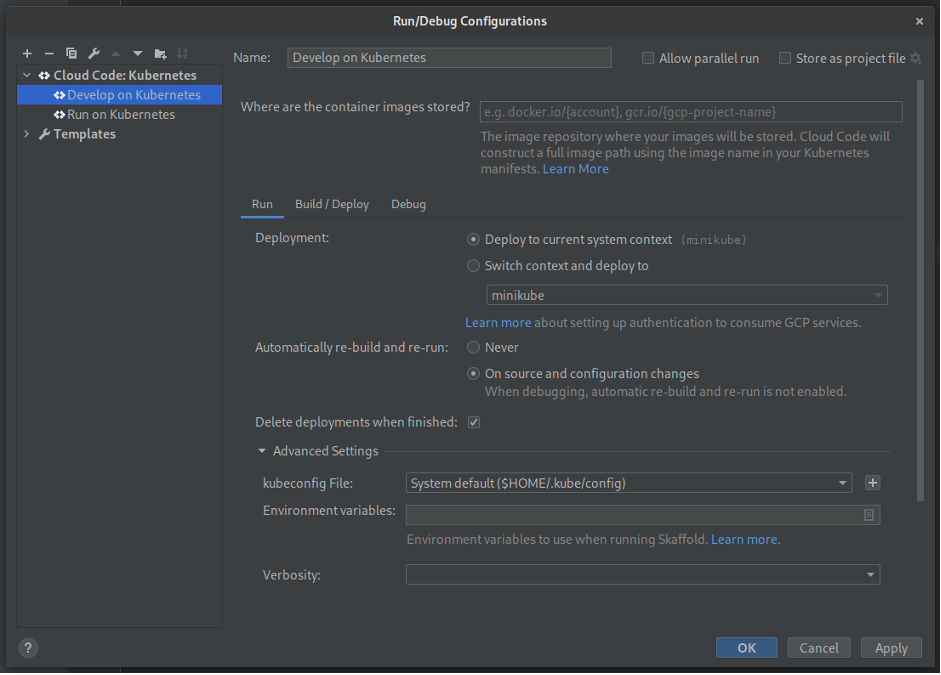
So far, we’ve been operating with Skaffold’s CLI. If you’re allergic to command lines or prefer not to leave your IDE too often, check out the Cloud Code plugin (https://cloud.google.com/code) for JetBrains IDE’s and VS Code. It detects the skaffold.yaml file in your project and creates run configurations for common Skaffold workflows so that they can be started with a click of a button in your IDE. It may look like it, but the plugin doesn’t actually expect you to use Google Cloud – the Skaffold feature works with any cluster. This provides you with an experience similar to running a Java app from the main class – just click Run and the application compiles and starts, plus the logs become available in the bottom panel.
This is what the plugin-generated configuration for “skaffold dev” looks like in my IntelliJ IDEA:
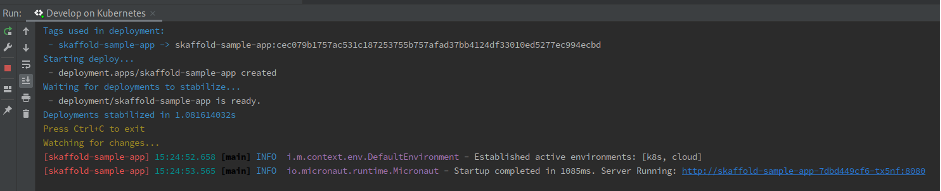
And this is the run configuration in action:
Summary
I hope this post has been helpful in understanding how the developer experience can be smoothened in a Kubernetes-based setup. It involves another command line tool and yet another YAML file, but it really ties everything together into a reasonable workflow. I have to admit, I haven’t played with its alternatives enough to compare (Tilt, Garden, and Draft are some of the popular ones), but I’m yet to find a scenario where Skaffold’s features seriously limit me.
Thanks for reading, and to learn more about Skaffold, check out the docs: https://skaffold.dev/docs/


Get in touch
Let us offer you a new perspective.